An easy ultra decadent no bake chocolate cake that is ready in minutes and doesn’t require you to switch on the oven!

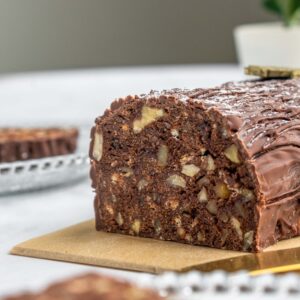
In summer I don’t feel like baking cakes and for only one reason: it’s too hot to switch on the oven! I opt to do some lighter desserts during these months, however, sometimes I end up missing the decadent and richness that only cakes give! My substitute for that is to make this delicious no bake chocolate cake. This cake is made from crushed up biscuits which are bound together with a chocolate buttery mixture. This then hardens and creates a rich base for this cake. I finish this cake with a luscious thick chocolate ganache which make this cake so smooth.

How to make the base for this No Bake Chocolate Cake?
Ready in a couple of minutes this chocolate cake is a no brainer. You first need to crush all the biscuits. Ideally you crush most of the biscuits finely and then leave some biscuits in bigger chunks. The latter will give the cake some crunch and create a beautiful marble effect. To crushed biscuits, add the cocoa powder, melted butter, milk, crushed nuts and sugar. Combine everything well until you get a big brown messy sticky mixture! Place this mixture into a springform pan, while pressing it tightly to create an even layer. Lastly, prepare the chocolate ganache and layer it on top of the cake. This no bake chocolate cake needs to rest for at least 6 hours so that it rests completely, especially the chocolate ganache! Serve by slicing into pieces, serve on its own or with a dollop of whipped cream on the side.

How to make the Chocolate Ganache?
The chocolate ganache is made by melting chopped chocolate in warm heavy or double cream. Chop finely the chocolate and place in a bowl. The finer the chocolate is, the quicker it will melt. Gently heat the heavy cream on medium heat until it starts to simmer. Pour the cream over the chocolate and let it rest for about 3 minutes. Once most of the chocolate has melted, stir until completely combined. Let it rest at room temperature for about 5 minutes. It’s good to let it cool down slightly so that it starts to thicken and it will sit on the chocolate biscuit base. As we need the ganache to be a bit sturdy, you need to chill the cake so that it hardens.

FAQs
Can I use other types of biscuits?
Most definitely! For this cake I have used the most basic biscuits in baking: Morning Coffee or also known as Petit Beurre biscuits. However, you can also use digestive cookies or even spice things up with speculoos, oreos, or whatever you fancy! You can also do a mix of more than one type of biscuit.
How to store this no bake chocolate cake?
It’s important to store this cake in this fridge, as it contains dairy and you will be risking that it melts! Before serving, let it rest for about 5 minutes, so that it will be easier to slice and you won’t risk breaking any teeth!
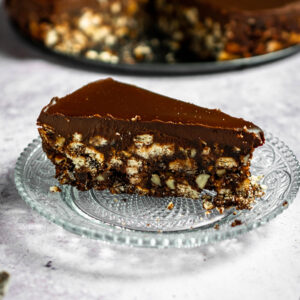
No Bake Chocolate Cake
Ingredients
- 800 g Morning Coffee/Petit Beurre biscuits digestive etc.
- 50 g cocoa powder
- 100 g sugar
- 250 g butter melted
- 60 ml milk
- 250 ml heavy cream
- 200 g chocolate
- 100 g mixed nuts optional
Instructions
- Lightly grease a 9 inch springform pan with cooking spray and set aside.
- In a food processor crush all the biscuits while leaving also a good amount of biscuits bigger.
- In a large bowl, add the crushed biscuits, chopped nuts, cocoa powder, melted butter, sugar and milk. Combine together until you get a sticky mixture.
- Place the mixture into the pan, and press it down to create an even layer. Store in the fridge while making the ganache.
- Chop finely the chocolate and place in a bowl. The finer the chocolate is, the quicker it will melt. Gently heat the heavy cream on medium heat until it starts to simmer. Pour the cream over the chocolate and let is rest for about 3 minutes. Once most of the chocolate has melted, stir until completely combined. Let it rest at room temperature for about 5 minutes.
- Pour the chocolate ganache over the chocolate biscuit base in the pan. Spread it evenly to create a smooth layer.
- Store in the fridge for about 6 hours or overnight, so that the cake sets well.
If you have any questions, feedback or comments on this recipe, please leave a comment below. Please also rate this recipe by double clicking on the stars below. If you did make this recipe, tag @apronandwhisk and hashtag #apronandwhisk, as I’m curious to see what you create!
Don’t forget to subscribe to the mailing list down below so to receive the recipe updates straight to your mailbox!






Leave a Reply