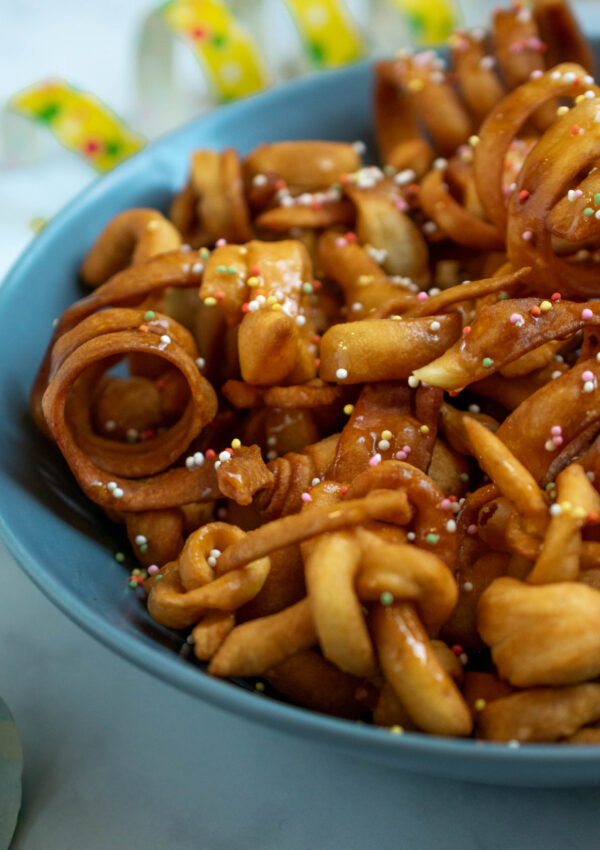
Tahinopita is a traditional Cypriot sweet bread that is considered naturally vegan. This pastry has a crisp exterior with a soft interior filled with a sweet and aromatic tahini mixture.
What Is Tahinopita?
Tahinopita (plural tahinopitas) are a popular sweet treat in Eastern Mediterranean cuisine as they originate from Cyprus. These tahini pies or tahini rolls are made out of humble ingredients. A simple pliable dough is made with flour, water and yeast. After resting, the dough is filled with a tahini, sugar and cinnamon mixture. Occasionally, carob syrup is also added to this mixture. I add some in my recipe here. I find that it complements whilst enhancing the flavour of these tahinopitas, and I’m a big fan of the earthy undertone it gives.
During my research about this recipe, I have noted the strong association tahinopitas have with Lent in Cyprus and Greece. Even though, these pastries are found all year round, they are hugely popular during this time. Tahinopitas are naturally vegan and therefore comply with the dietary restrictions observed during Lent by Orthodox Christians, which prohibits the consumption of meat, dairy and eggs. For my Maltese readers, I compare this to our Kwareżimal which traditionally is naturally vegan. Although, for both tahinopitas and kwareżimal there are modern inclusion of non vegan ingredients such as honey.
Why Tahinopita Is Vegan-Friendly
Tahinopitas are the delicious vegan-friendly without trying too hard to be one! In the traditional recipe for these sweet breads there is no use of any animal derived ingredients. Tahini is considered the main ingredient and flavour profile of this treat, with it being made solely from sesame seeds, it is naturally vegan. When using tahini, which is already a rich creamy ingredient, there is no need to use any butter or cream which can be common ingredients used in similar recipes.
This is also the case for the dough! As tahinopitas use a simple dough, that aims for a crispy exterior, there is no need to use any eggs or dairy, thus making them ideal for those avoiding animal products. Lastly, for that added sweetness sugar or carob syrup are commonly used, although you can get versions with honey. Yet this may easily be substituted with the others.
Step-by-Step Recipe for this Cypriot Sweet Tahini Bread
Making tahinopitas is fun, although it requires a little bit of labour to get the wonderfully layers of flaky filled goodness. Prepare the dough and the filling first. To assemble these sweet breads there are plenty of different methods out there, however, my favourite is the one I’m sharing here. It’s one of the most traditional methods which for me yields the best texture and distribution of filling, making every bite unforgettable.
Start by dividing the dough into 6 equal parts. On a floured surface, roll each piece into a rectangle of about 30 x 20 cm. Spread the tahini mixture over the rectangle. Roll the dough up with the filling inside. Whilst still rolling, twist and elongate the filled dough. Do not worry if some of the filling starts oozing out, on the contrary this will make the tahinopitas tastier. You need to roll until you get a twisted rope twice the length the one you start with. Once you reach the desired length, coil each end until you reach the middle. Place the two coiled pieces on top of each other and press tightly together. I prefer to press down with a rolling pin. Place the coils on top of the prepared baking sheet. Repeat with all the pieces.
After letting them rest for about 30 minutes. Bake the tahinopitas at 180°C or 350°F for about 45 minutes until nicely golden brown. Half way through the cooking, take them out and brush with some carob syrup. As soon as they are baked, I rebrush them with more carob syrup. Let cool on a cooling tray. All the delicious syrup post baking will make these tahinopitas extra sticky, that will truly make you lick your fingers so not too lose any of the goodness.
FAQs
Storing and Serving Tahinopita
Tahinopitas are best to be enjoyed the day that you make them! I like them slightly warm. However, if you have some leftovers, I stored them in an airtight container at room temperature and slightly heat them up before serving. I wouldn’t recommend storing them for more than 3 days as they will harden with time!

Tahinopita – Cypriot Sweet Tahini Bread
Ingredients
Dough
- 500 g plain flour
- 7 g active dry yeast
- 250 ml water
- 15 g sugar
- 6 g salt 1 teaspoon
Tahini Filling
- 250 g whole wheat tahini
- 100 g brown sugar
- 60 ml carob syrup
- 1 tbsp cinnamon
Sugar Glaze
- 20 g brown sugar
- 10 ml water
Instructions
Prepare the dough:
- In a small bowl mix the sugar and yeast in the lukewarm water and let the yeast activate for about 15 minutes until foamy. Add the flour and salt, mix until you get a smooth soft dough. Place the dough in a bowl, cover and let it rest for about 1 hour, or until it doubles in size.
Prepare the filling:
- Mix the tahini, brown sugar, carob syrup and cinnamon in a bowl. Mix well to combine. Be careful not to overmix or the paste will thicken too much.
Assemble the Tahinopitas
- Line a large baking tray with parchment paper and dust it with flour. Set aside.
- After the dough has risen, divide into 6 equal piece. On a floured surface, roll each piece into a rectangle of about 30 x 20 cm. Spread the tahini mixture over the rectangle. Roll the dough up with the filling inside. Whilst still rolling, twist and elongate the filled dough. You need to roll until you get a twisted rope twice the length you start with. Once you reach the desired length, coil each end until you reach the middle. Place the two coiled pieces on top of each other and press tightly together. I prefer to press down with a rolling pin. Place the coils on top of the prepared baking sheet. Repeat with all the pieces.
- Cover the baking sheet, and let rest for about 30 minutes. In the meantime, preheat the oven to 180°C or 350°F.
- Bake the tahinopitas for about 45 minutes until nicely golden brown. Half way through the cooking, take them out and brush with some carob syrup. As soon as they are baked, rebrush them with more carob syrup. Let cool on a cooling tray.
Nutrition
If you have any questions, feedback or comments on this recipe, please leave a comment below. Please also rate this recipe by double clicking on the stars below. If you did make this recipe, tag @apronandwhisk and hashtag #apronandwhisk, as I’m curious to see what you create! Don’t forget to subscribe to the mailing list down below so to receive the recipe updates straight to your mailbox!


Leave a Reply